This post brings us back from the surreal world of The Wizard of Oz to the surreal world of vertebrate paleontology. I'm finally following up on a post-SVP promise to chronicle the tour of the Paleontological Conservation Unit at The Natural History Museum in London. The day began standing around the front gates until a helpful fellow attendee who read the directions (Greg Brown) pointed out that we should be using the side entrance for staff and visitors. Thanks Greg.
I think it would be fair to describe the PCU facility as cavernous. Despite my best efforts I couldn't capture more than, say, 26.2% of the lab in any particular photo. The first one is looking towards the corner where fossil preparation takes place. I've long been interested by the PCU as laid out on their website (links are all dead thanks to a remodel), which defines all aspects of working with specimens based on the corresponding roles within the fields of conservation and preparation. In principle this sounds really great, but after seeing the operation more or less in practice (at least in demonstration) I've begun to rethink some of my preparation philosophy. That topic probably strays too far afield for this post, so we'll get back to the tour already in progress.
PCU Fossil Preparator Scott Moore-Fay holding up a specimen that he is working on, that may have been a trilobite, time is the enemy of my memory. He has a very nice Leica stereo microscope mounted on an articulating arm, and a helpful bellows-adjusting head. There is a ring-light mounted on the objective, good lighting around the workstation, ceiling mounted exhaust, and a plethora of overhead electrical outlets that I like to have everywhere to eliminate extension cords.
Scott's workstation, I also like the table top flammable cabinet. Good chair.
Ooooooo....ahhhhh....
We are going to leave the main lab briefly and step down a corridor to the acid preparation lab. Holy smokes, another whole lab for acid preparation? Yup. In this photo you are seeing a little over half of it. Look at these great, ventilated acid baths. Acid can be fed into them from an outdoor storage tank that might be around 300L, though I may be wrong on quantity. I also recall that this lab uses acetic acid almost exclusively, but that can also be corrected by those more knowledgeable. I'm going to break this post here so I can get some other things done, and will follow up with the rest of the tour, finish off in the acid lab, and discuss the conservation aspects of the PCU. This might also be a good place to point out that Scott is the only full time staff preparator at the Natural History Museum. Amazing, I know. For those who haven't worked in an institution this size, it can be tough to wrap your mind around the fact that there could be something in the neighborhood of 1000 years or more of backlog preparation in the collections alone, which seems like it represent great job security for that lucky dude or dudette.
Tuesday, December 15, 2009
Saturday, December 5, 2009
This day in paleontology history...
Well, it might not have been this exact day, but at some point, roughly a couple of days after Thanksgiving 1999, I completed my 20+ hour drive from Chicago to Orlando Florida, after my term on the Sue project, to start my new job at the Field Museum's satellite preparation lab at Disney's Animal Kingdom Themepark.
I moved in with Casey Holliday and his roommate Tom Mullane, who worked for Disney Education, for a couple of weeks while I found an apartment, just 10 very short years ago.
The lab was built by Disney for the Sue project, which they cleverly funded in partnership with McDonald's, United Airlines, the Field Museum, and others. Disney had the "Dinosaur" movie in the pipeline, and created Dinoland in Animal Kingdom as a product tie-in.
During the Sue project, Casey Holliday, Bruce Schumacher, and Joanne Avery prepared over 50% the skeleton in this lab. I arrived after Joanne left, and Bruce was on his way out to his new job with the US Forest Service, and I brought a microscope and some fossils from the Triassic of Madagascar. During the next 11 months, Casey and I prepped the Triassic material, some Cretaceous Malagasy material (titanosaurs, croc and theropod bits) and a juvenile tyrannosaurid collected by Elmer Riggs in Alberta in 1922.
Here I am at the age of 18 in a rare, non-bearded photo, holding up the right tibia and femur of that tyrannosaurid. Behind me is the view out of one of our 3 glass walls. This lab was in the middle of a theme park with a capacity of about 35,000 people, which was often met during busy travel periods. Overall, it was an odd place to work, but tons of fun. Casey is a great guy to work with, and the ability to go over to MGM Studios over lunch and ride a roller coaster, Aerosmith's Rock n' Roller Coaster no less, makes the best job in the world even better.
The lab, full of molds of Sue's cervical vertebrae.
Casey and Bruce moving Sue's femur with a crowd of onlookers, in National Geographic, 1999. As weird as this place was, I'd go back to work there in a heartbeat. Disney had student members of it's college program work outside the lab in costume, making presentations to large groups of visitors. The lab was situated near the exit of the "Tarzan" live stage show, which seated a few thousand people. Every hour or so, the show would dump, and the path leading by this glass became one of the exits for the show, exposing us to more visitors in 15 minutes than most museums get in a week, a day for the very largest.
The extreme humidity of central Florida led to frequent problems with the air abrasive units, but the most interesting of troubles came from the exhaust system. The Nederman arms were ducted to a blower on the roof, and when blasting through many pounds of sodium bicarbonate the blower would "clog". Once every two weeks or so we would have to climb up on the roof, and remove an access panel to expose the fan blades. The sodium bicarb would build up on the blades and form a pumice-like rock that had to be chipped off with a hammer and putty knife. This maintenance was critical, because the buildup threw the fan so off balance that not only would it rattle the walls, but the floor itself. Firing the system back up after this cleaning was always awesome, sending up an ejecta of white powder that drifted over Dinoland. The ladder to the roof was also handy for climbing up to watch shuttle launches. After work was a great time to walk through this giant zoo with a beer and check out the animals, or catch a safari ride, and maybe make plans to head to the Big Bamboo Lounge, a hole in the wall Disney hangout that deserves it's own tribute post.
We also kept a minifridge stocked with Corona and limes, which made the lab a popular aftershift hangout for the education staff.
Sadly, as soon as the Field Museum contract was up, Disney bulldozed the lab to build a roller coaster. I got them back by knocking down a couple of their streetlamps with the moving truck on my way out of the park. Thanks Casey for providing the photos, all of mine were stolen by a psychotic former co-worker.
Tuesday, December 1, 2009
Christmas in December... (Free PDF's!!!)
For your reading pleasure, I have some more preparation related PDF's, courtesy of the Geological Curators Group and the GCG Archive. Thanks to Amy Davidson for scouring these back issues and providing some recommendations, especially regarding adhesives.
Check out:
Geological Curator Volume 5 no.7 (1987) Proceedings of the 1986 GCG Conference which is devoted to the Conservation of Geological Material and edited by Crowther and Collins. Note especially-
Keene "Some Adhesives and Consolidants used in Conservation" p.421.
Jaeschke "Archaeological Conservation: Some Useful Applications for
Geology" p.467.
Also recommended are:
Larkin, N.R. and Makridou, E. “Comparing Gap-Fillers Used in Conserving
Sub-Fossil Material.” Geological Curator 7,2 (1999) pp.81-90.
Buttler, C.J. “The Conservation of the Sedgwick Museum Barrington
(Quaternary) Hippopotamus Skeleton” Geological Curator 6,1 (1994) pp.3-6
Others that may be of interest/useful are:
Howie, F. Pyrite and conservation pt 1: Historical aspects. Vol 1, 9
and
Howie, F. Physical Conservation of Existing Collections. Vol 2, 5
Also relevant in Vol 1,9 is "Problems with Resins at Bolton" by A.C. Howell
and "Data Security in Scientific Objects" by C.P. Palmer.
There are a bunch more out there, if you happen to come across anything that you find helpful in your journeys through the literature, shoot me a message and I'll post it. Thanks again to Amy for kickstarting this, and to the good folks at GCG for hosting this content and not charging $35 per article to download it.
Sunday, November 22, 2009
3rd Annual Fossil Preparation and Collections Symposium
The Field Museum will be hosting the 3rd Annual Fossil Preparation and Collections Symposium in Chicago from April 28-May 1, 2010.
I organized the first meeting at Petrified Forest National Park, which was a great success, about 45 people showed up, and we all had a lot of fun (pictures here, thanks ReBecca). J.P. Cavigelli hosted the next meeting this summer at the Tate, with I think about 65 or 70 attendees, which was also fantastic {update, some pics here, thanks again ReBecca}. Thanks to the Field, Geology Department Chair Pete Makovicky, and host Lisa Herzog for taking the reins in 2010.
A major contributing factor to the success of these meetings is presentations from people like you! If you have an idea for a talk, poster, or workshop, hurry up and get in touch with Lisa.
"The Field Museum is located on the shore of Lake Michigan in downtown Chicago and has a long history of vertebrate fossil preparation. It currently houses three operational fossil preparation laboratories, employs five full time preparators, and maintains an active volunteer program.
The three day symposium will feature collection tours, platform and poster presentations, roundtable discussions and preparation workshops. This is a distinct opportunity for fossil preparators to meet and talk with other professionals and volunteers in the field.
Any questions or comments should be directed to the conference organizer Lisa Herzog at lherzog@fieldmuseum.org or 312-665-7626. Suggestions for roundtable discussion are welcome."
Saturday, November 21, 2009
Some old (Historic) preparation references online (free)
After downloading a number of pdfs last week, I thought I would help make some of these easier to find.
Charles Schuchert: 1895. Directions for Collecting and Preparing Fossils. Pt. K, Bull. US Natl. Museum, no. 39, 31 pp., 19 illus.
Adam Herman: 1909. Modern laboratory methods in vertebrate paleontology. Bulletin of the AMNH ; v. 26, article 23.
Don Baird: 1980 The burnt dope technique, and other intertidal ploys from America. Geological Curator 2:8
(Free if you have institutional subscription, if not, send me an email)
(Stabilizing inverts)
A Method for the Preparation of Fossils
Author(s): G. Arthur Cooper
Source: Science, New Series, Vol. 77, No. 1999 (Apr. 21, 1933), p. 394
Published by: American Association for the Advancement of Science
Stable URL: http://www.jstor.org/stable/1656997
(Nonprep methods)
The Preparation of Paleontologic Illustrations
Author(s): John B. Reeside, Jr.
Source: Journal of Paleontology, Vol. 4, No. 3 (Sep., 1930), pp. 299-308
Published by: Paleontological Society
Stable URL: http://www.jstor.org/stable/1297906
Ammonium Chloride Sublimate Apparatus
Author(s): Chalmer L. Cooper
Source: Journal of Paleontology, Vol. 9, No. 4 (Jun., 1935), pp. 357-359
Published by: Paleontological Society
Stable URL: http://www.jstor.org/stable/1298246
Friday, November 20, 2009
My powers are godlike
Ok, so maybe I should have saved that title for a case study that demonstrates those abilities in a spectacular way, like, the tiny chip of enamel that I glued back onto a cusp from a tooth measuring under 1mm in total length. In that case though, it shouldn't have broken in the first place. I'm just so pleased with the ease and simplicity with which this little sub-project came together.
Anyway, while preparing to install the cabinets, I was despairing that I would have to shim the crap out of them, the 65 year old brick floor slopes one half inch over 25 inches, the first photo shows this. So, I was thinking about floor leveling options, like that self leveling stuff that you put down before tiling a floor. I figured that it would take forever to set up thoroughly in that thickness, then it occurred to me that Hydrocal might be a workable option.
First I built a dam out of clay, which wouldn't stick to the newly waxed, slightly dusty floor all by itself. So, cleverly (I think), I smeared Vaseline along the bottom of the clay, then pushed it down, and bingo, a water tight adhesive gasket. I then taped three pieces of string to the high point of the floor, near the wall, and pulled them taught and through the clay. Using a bubble level, I set my desired height in string, then poured Hydrocal into the dammed area, smoothed it by hand and then trowel, checked the level again, and called it done.
Here is the Hydrocal pad... And finally, almost PERFECTLY level with one cabinet on. I'll be back next week to finish up the installation in preparation for the arrival of the counter top.
Moving right along
On schedule, just waiting for the Resistop counter and the installation of the fume hood, then all should be right with the world.
Sadly, not only did the shipping company deliver the Global cabinets to the wrong address, requiring several hours of my day to track down and pick up, the bastards managed to bash the hell out of the floor cabinets. After a little bit of pounding with a hand sledge and a block of wood, the doors open and close again, but this point may receive further airing here if the Global Industrial customer service people don't return my calls.
Tuesday, November 10, 2009
Stay tuned...
On coming episodes of This Old Preplab we will be remodeling this plaster room, gutting the left side that we see here, putting in the previously discussed fume hood, acid storage, and new counters, and generally making it look like this. Watch as we as we transform a cluttered workspace into a slightly less cluttered colored pencil rendering.
Inner workings
Back to the lift tables for a brief moment, here we can see the mechanism by which they do their magic. Centered under the table is a 3 ton bottle jack, operated with the lever the extends to the table edge. This jack is the only hydraulic part of the mechanism, lifting and lowering the tabletop, while the load is stabilized by the four pistons at the corners. The large, four inch diameter sleeve contains three machined nylon "doughnuts" that keep the two inch steel tubing aligned. Since hydraulic jacks are not designed for, or safe for, supporting weight, the two inch tubing is drilled at intervals for pins that hold the full weight of the table at rest. So, the table is jacked up, pins are set, and then the jack is released so that the table is safe to work on, around, and under. Voila.
Sunday, October 25, 2009
Installing the work benches
David Braley, the brilliant welder in the Pickle Campus facilities department, fabricated the metal framework for the work benches that line two walls of the lab. This bench is a giant L, 30" deep, 22' long on the longest arm, and 9' long on the short. This frame is incredibly straight and level, a very difficult task, but supremely executed by David. The whole construction is 2" tubular steel, supported by leveling feet for easy installation. The short leg abuts the long, and is both bolted and pinned, creating an incredibly stable platform to epoxy the table tops in place.
I decided to go with the same tabletop material that we used for years at the Field Museum. Bill Simpson performed some rigorous testing on samples from various manufacturers, and finally settled on Resitop, a composite of phenolic resin and craft paper layered densely and cured under pressure and heat. Then it is topped off with a melamine laminate top in a wide variety of colors and patterns. I have always been very happy with the Resistop, it is widely resistant (perhaps impervious) to acids, bases, and solvents. It is also resistant for at least a few minutes to direct flame. The company we ordered from stocks white, black, and grey, other choices cost much more, because you pay for each 5'X7' panel instead of just the material that you actually use. We went with one inch thick at roughly $23 per square foot, including a four inch high backsplash on the workbench.
After spending quite a bit of time leveling the frame with the tops in place, the resin tops were epoxied onto the frames using West Systems Marine Epoxy thickened with a little bit of Cabosil to fill any void space, and were then clamped all around with C-clamps. Backsplashes were then epoxied and clamped, and will be filleted with more epoxy.
Wednesday, October 21, 2009
The 3rd Armored Table Division rolls into Austin....
We would do General Patton proud, not only did I fight the Romans as a Carthaginian in a past life, but our new piece of furniture, MBT (Main Battle Table) 01, has just made its way into our loading dock. For scale, Sebastian > 2m. This table has a 5' x 7' work surface, adjusts between 28" and 40" lifted by a 3 ton jack, all by itself weighs about 900 pounds, and since I couldn't figure out how to keep tank treads from scuffing the new wax job on the floor, we went with wheels. Yeah, that sucks, but what can you do. This photo shows the table at full height, before we epoxied the Resistop table top in place.
And after, table lowered. I'll follow up some of the specifics of how it was built in the next post.
Wednesday, October 7, 2009
The labs at Bristol
Remmert Schouten said he wanted to see a new blog post, so here you go dude. In addition to doing a great job putting together the adhesives and consolidants workshop, Remmert was kind enough to give us a tour of his lab at the University of Bristol. Here Remmert is giving a tour to the SVP preparators.
That's actually not true. However, he wasn't kidding when he showed us his lab shoes, actual wooden clogs. This might come as a surprise to us North American fossil people, but clogs are actually rated by the EU and UK as acceptable safety footwear, being resistant to acid and puncture.
If you don't believe me, check out Wikipedia.
During the tour, we passed around another item worth discussing, a stone masons hammer. I've seen these called dummy hammers or round hand hammers, and are available from a few sources on the internet, usually for about 25 or 30 US dollars. These hammers are used with typical chisels, a method that I like quite a bit in harder matrices for removing large quantities of matrix. Having a range of hammer and chisel sizes allows a great degree of accuracy in removing matrix, I've even prepped right up to the bone surface this way.
Remmert described the ability to finesse a wide range of strike force out of the mallet by adjusting how much you choke up on the handle, and by what part of the head with which you hit the chisel. A blow from the broad end of the tool will direct more force at your chisel and block for coarse work, and gentler taps towards the base of the head where the steel meets the wood will allow for gentler and more precise work.
Thanks very much to Remmert for the opportunity to see his lab, and for the work he contributed as part of the Host Committee for SVP Bristol.
Tuesday, October 6, 2009
24 hours of late night
Well, dear friends, my mind is blown. I've seen some surreal shit in my life, not the least of which are the Salvador Dali museum I visited last week, and the direct flight from Paris to Dallas Forth Worth I-airport.
However, starting two nights ago on Letterman Steve Martin played the banjo with the convincing head of Muammar Qaddafi, which I could handle. But tonight, of all bands, KISS performed on Dave. Gene, Ace, Paul, and Peter. In their seventies. Not the right venue. Followed immediately by Craig Ferguson and a bunch of other people in blonde wigs lipsyncing Mmmbop. Then Chick Corea on freakin Jimmy Fallon?!?! Disgusting.
Nearly recovered from SVP
Like many paleontologists, I took advantage of this year's phenomenal SVP location to spend some time seeing other European paleo. My trip would have been an exhausting whirlwind, if not for the tremendous energy that this meeting generates for me every year. Also like many other paleontologists, I ride a high for months after we all go home.
This meeting generated several topics to post about, and as I get my photos, notes, and thoughts sorted out, I'll be following up on those, hopefully having it all wrapped up by the end of the week. I'd have more done tonight, but I'm going to see Zombieland. Priorities, priorities. Briefly, my schedule looked like this:
Sunday- Arrived in London, met up with Sarah Werning, went to pub. Slept on the floor of Sarah's bathroom.
Monday-Started day with tour of the Natural History Museum Paleontological Conservation Unit. Had a late lunch, saw the fossil gallery, visited the Wallace and Grommit exhibit at the Science Museum. Caught bus to Bristol. Added London to the list of major cities that I've been to and only seen the science museum and bars.
Tuesday-Exciting 8 hours at adhesives and consolidants workshop (really!) Went to pub and talked about adhesives and consolidants for a few hours. Went to another pub and pissed people off by talking about adhesives and consolidants some more. Wednesday begins about here.
Wednesday- Excellent day of some talks, posters, mostly meetings with other folks. Great discussion with Amy Davidson, Greg Brown, and Bill Parker about the role of preparation within paleontology. Welcome reception in the evening, followed by pubs, Indian food, pubs, and then clubs. Some members of our group were picked up by the "classy" scantily clad Bristol ladies that Jeff Martz writes about, this evening ends on Thursday as well, returning to my hotel at about 5:00.
Thursday-Absolutely brutal schedule, Romer talks, Triassic talks, Prep talks, and birds all apposed each other. Some really good talks were presented at the prep session. Preparators Committee meeting was very productive. Saw David Attenborough give an excellent talk on Alfred Russel Wallace and Birds of Paradise, wonderful night. Hosted a student roundtable on getting non-academic jobs: prep, collections, contract paleo, government paleo, etc. Afterwards, Jeff's Beaver Stuffing event took place.
Friday- Wow, this is getting ridiculous. I'll just say the rest of the trip was a blast- Spent all night on Saturday hanging out with as the crowd slowly dropped away, the last SVP allnighter was Sarah Werning and I hanging out in the hotel lobby, watching the Bristol police haul away some disorderly young girls. I took a cab to the airport, and headed to Paris for five days. I'll have some photos of the prep lab there to post shortly.
Monday, September 14, 2009
All those stinky fumes
I wish that I'd had a fume hood already for much of this project, instead, I've been overhauling one that I rescued from surplus to install in the lab. It came from the Marine Science lab, so is fairly well coated with salt that needed scrubbing off, in addition to removal of the sink. On testing, the fan and lights still worked great, so I onward I go.
Step one was pulling out the sink, cutting a piece of plywood to fit, and glassing the hole flush. I used layers of woven fiberglass and Gougeon Brothers West Systems Marine Epoxy to fill that gap, along with another hole in the right back corner. I sanded the bottom of the hood heavily, and then began painting in the same epoxy, pigmented black, to completely cover the fiberglass bottom. This will create a durable, easy to clean and repair surface for the light acid preparation, resin mixing, and fumed silica work that will take place in the hood. Our welding shop is fabricating a base to support the hood and surround the acid cabinet that will be placed below.
I'll post more pictures when the project is finished and installed.
Thursday, August 27, 2009
Airline filtration
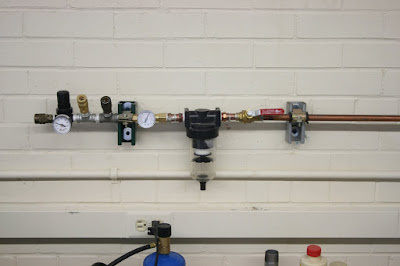
I stated in a previous post that the air compressor and tank are outside the building. They are in a 100+ degree shed all summer (which is from Feb 16- Feb 12, as far as I can reckon) without any kind of chiller or cooler before it comes through the wall. This drastic change in temperature between the outdoor temps and the air conditioned lab generated gallons of water condensing in the airline. This corroded the pipes and fittings, plugged the tools, and clogged the air abrasive unit. Also, and apologies to the elderly, but I think you'll know what I mean, when you unplugged a tool from the quick connect you got blasted in the face with oily wet air that smelled like old man for hours.
The first picture shows the air coming in as a Z of black pipe to the left of and behind the first filter. That filter is the primary water trap, which when drained yields a few ounces of water every day. The next unit is a general particulate prefilter, before the oil filter, with the red label, and finally, the long tube of the dessicant filter, that holds four pounds of cobalt indicating silica beads. This multi-pronged attack seems to have made a substantial difference so far in the amount of moisture that harasses us.
After the filters, the plumbing gets slightly more complicated. The 1/2" copper schedule L line exits to a T fitting, and one pipe runs up and across the ceiling to supply air to the middle of the room, where large worktables will soon sit. The other line runs down, and then splits to two regulators, where all of our air then runs in parallel lines of low and high pressure. The high pressure is for Microjacks, AROs, etc, and the low is for foot pedals, air guns, and some of the new tools that we are now getting from Charlie Magovern. We then have air hookups spaced every four to five feet equivalent with the location of workstations, with two quick connects for each line. Both ceiling and wall lines also have ball valve shut-offs inline after the filters for safety and maintenance.
Some of our offices have air supplied from the same system also, here you can see the set up at the workstation in my office. The air comes in from the right of the photo, passes through a ball-valve, then an oil an moisture trap. I've installed a small ball-valve operated pressure "indicator", it's not a real regulator, just so that I know what the incoming pressure is. After that I have two high pressure quick connects, an actual regulator, and a low pressure outlet for my foot pedal. The air line running to my offices passes through about 30 feet of non climate controlled collections, then back into the AC, so I still get a fair amount of moisture condensing there and ending up in the filter. After filter is now much much drier than it was before this changeover.
Saturday, August 22, 2009
Lab reno' part two, er, maybe 3?
When we first consulted with the UT Facilities department to find out what it would cost to replace the air system, the head of their plumbing shop gave us an estimate of two guys for two weeks, at thirty bucks an hour, plus supplies and materials. That quickly comes out to a number around $6000, plus all of that downtime for the 4-5 people who work in the lab in a normal week. In dismay (and disbelief, since I know how difficult this sort of plumbing is), we asked if we could do it ourselves. The answer was yes, but clearly they didn't think it was a good idea.
After a few trips to the hardware store, some consultations, and a few hours online weighing the options, I decided to go with copper pipe to replace the mix of materials already in place and causing problems. Then, with this pile of fittings and tools, and 100 feet of schedule L pipe, Sebastian and I took to the task of installing the system. Instead of two weeks, it took two long days, with much of that time spent by me running around buying parts to make sure Sebastian had everything needed to keep the project moving. The following pictorial is a brief outline of the steps involved in sweating copper pipe.
Step 1: (Currently no photo) After cutting the pipe to length, all surfaces to be joined are scrubbed bright with a wire brush and painted with a thin coat of flux to ensure flow of solder.
Step 2: Pipe sections are mated with fittings, then heated with a propane torch for 10-20 seconds, until the metal is hot enough to melt the solder on contact.
Step 3: The torch is withdrawn, and the solder is applied to the hot joint. It will melt instantly and be drawn into any gap space, solidly connecting the two separate pieces of metal.
Step 4: The joint is wiped with a cloth to remove remaining flux and excess solder from the surface.
Friday, August 21, 2009
More traditional uses of fire in the lab...
Disclaimer: No Fossils Were Prepared in the Following Blog Post
This was an exceptionally busy week in the lab, and the only time we touched fossils was to get them out of our way. The first major phase in the lab renovation began on Monday, with half of the room being repainted. Some big cabinets with not much in them were taken off the walls, large cracks in the masonry were sealed up, and all of the existing airlines were removed, more on those soon. The walls were then given a fresh couple of coats of white semi-gloss enamel, which really makes it a whole new room.
This project was in preparation for the main event of August, replacing the compressed air delivery system. The existing airlines were composed of black pipe, galvanized, copper, brass, and maybe PVC. The compressor and tank is outside the building in 100 degree heat for most of the day, passes through the wall into a 70ish degree room, and immediately begins condensing tons of moisture in the airline. We drain about half a cup or more of water out of the tank each day, and about the same out of the water trap inside the lab. The mix of metals in the system ensures quite a bit of corrosion in the parts, most every fitting has some form of rust inside of it. The air tools have recently begun clogging at a high frequency requiring complete breakdown for cleaning several times a week.
So, the fun stuff.
With the help of the very able and German Sebastian Egberts, I've spent the last half of this week installing a completely copper air system. While I was shuttling back and forth between two Home Depots and one Lowe's buying up every fitting they had in stock, Sebastian measured and cut the copper pipe and soldered the quick connect fittings into place. After two full days of work, we have the system nearly complete and leak free, another post will follow up in detail the process of getting the system in place, with, yes, more pictures of fire in the lab.
Wednesday, August 19, 2009
Saturday, August 15, 2009
Let me stand next to your fire....
In tribute to the 40th Anniversary of the Woodstock Music and Arts Fair, and by request of Casey Holliday, this post will deal with a method developed by Holliday and Brown in 1999 at the Walt Disney World Animal Kingdom Fossil Preparation Field Station. The "Pyro Preparation" method is specifically used to facilitate safe removal of plaster and burlap field jackets from very delicate specimens. The technique was created to deal with vertebrae of Rapetosaurus krausei where much of the matrix had been removed in the field, followed by application of a thick (~2-3 cm) and tightly conforming plaster jacket. Removal of the field jacket in the lab by traditional means was impossible without significant damage to or destruction of the fossil material, as the vertebrae were poorly mineralized and subject to substantial weathering before discovery. This condition resulted in extremely crumbly bone that was very difficult to consolidate with the jacket in place. The field jacket was tightly wrapped around the neural spines and left transverse processes of several articulated vertebra, with little to no matrix buffer between the bone and jacket. The mechanical lock created by the conforming plaster exerted considerable leverage on the bases of the spines, and attempts at removing the plaster with a razor blade and Stryker cast cutting saw resulted in much breakage and grinding of elements. In desperation we decided to try fire as an option. First, the plaster is gently scored with a razor blade to expose the underlying burlap, then a volatile solvent (in this case acetone) is applied to the burlap. When ignited, most or all of the burlap burns up, allowing the next layer of plaster to be crumbled and scratched away (Fig 1). Before being applied to the fossil, this technique was attempted with the experiementers hand slipped between the jacket and matrix, to ensure that temperatures inside the block would not be high enough to cause damage through thermal shock or scortching. After several layers of burlap were burned away, the jacket was pliable enough to remove by slowly peeling it away, while applying consolidant to the freshly exposed and friable fossil surfaces.
Labels:
Burn Baby Burn,
Hendrix,
preparation challenges
Thursday, August 13, 2009
Cool old Carl Zeiss microscope
I found this old critter here at VPL, a Carl Zeiss Jena microscope. The right eyetube is also stamped with a Bausch and Lomb Optical, Rochester, New York logo. The last photo is after cleaning, the brass and nickle plated elements look great after a little bit of elbow grease, the would probably look even better with a lot of elbow grease.
Current lab renovation projects
So, I guess if one is going to start a blog, they must occasionally post to it. This is just about the last thing I remember to do, since I'm not yet in the habit.
There are two projects dominating my time right now, designing new work surfaces and planning for the re-plumbing of the compressed air line. I'll go into greater detail on both soon as the projects come together, both are a lot of fun, and both will be something I have to live with for quite a while, so I want to get them right. The tables are almost out of my hands, I'll be placing the final order for the tabletops tomorrow or Monday, and my sketches have been handed over to the fabricator in our facilities department to start construction on the bases.
I'm also working on cleaning up a fume hood that I rescued from the UT Surplus warehouse that will serve for a few years until it is upgraded. Pictures of that process will follow in future posts as well.
Thursday, July 9, 2009
Wednesday, July 8, 2009
Hey, That Ain't Gatorade!
Have you seen a situation like this before? Sure, it is very convenient, and cheap, to store lab chemicals in food containers. But it's not cool. For one, the turpentine in that coffee can isn't much use now that the volatiles have all evaporated out. Then, what the hell is the white powder all over the mayo jar of xylene? I don't think it is mayo. I think this kind of storage is against the law, though I can't find a reference immediately, but it certainly violates both recommended practice (see NIOSH/CDC guide) and common sense.
The Grolsch bottle in the background full of acetone reminds me of a story from a few years back, a friend was working on his boat, and pouring waste epoxy into a nearby empty beer bottle. A few minutes later, when reaching for his bottle full of beer, he grabbed the one with epoxy in it. One short trip to the emergency room later and a cheap and handy way to dispose of a chemical becomes neither cheap or handy. A final example before I go. One prolific collector that I know loves to store thick solution adhesives (i.e. Vinac B-15) in little Visine eyewash bottles. Well, sure, they work well for dispensing adhesive cleanly and one drop at a time. But in the field, have you ever gotten dust or dirt in your eye, and wished for eyewash? Does a foreign object in the eye blur your vision? Might you consolidate your eye closed? So much for getting the red out.
Be Cool. Only store chemicals in properly labeled containers not intended for food use.
Friday, June 26, 2009
Subscribe to:
Posts (Atom)