Thursday, August 27, 2009

Airline filtration


I stated in a previous post that the air compressor and tank are outside the building. They are in a 100+ degree shed all summer (which is from Feb 16- Feb 12, as far as I can reckon) without any kind of chiller or cooler before it comes through the wall. This drastic change in temperature between the outdoor temps and the air conditioned lab generated gallons of water condensing in the airline. This corroded the pipes and fittings, plugged the tools, and clogged the air abrasive unit. Also, and apologies to the elderly, but I think you'll know what I mean, when you unplugged a tool from the quick connect you got blasted in the face with oily wet air that smelled like old man for hours.

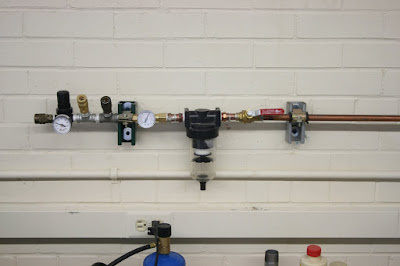
The first picture shows the air coming in as a Z of black pipe to the left of and behind the first filter. That filter is the primary water trap, which when drained yields a few ounces of water every day. The next unit is a general particulate prefilter, before the oil filter, with the red label, and finally, the long tube of the dessicant filter, that holds four pounds of cobalt indicating silica beads. This multi-pronged attack seems to have made a substantial difference so far in the amount of moisture that harasses us.

After the filters, the plumbing gets slightly more complicated. The 1/2" copper schedule L line exits to a T fitting, and one pipe runs up and across the ceiling to supply air to the middle of the room, where large worktables will soon sit. The other line runs down, and then splits to two regulators, where all of our air then runs in parallel lines of low and high pressure. The high pressure is for Microjacks, AROs, etc, and the low is for foot pedals, air guns, and some of the new tools that we are now getting from Charlie Magovern. We then have air hookups spaced every four to five feet equivalent with the location of workstations, with two quick connects for each line. Both ceiling and wall lines also have ball valve shut-offs inline after the filters for safety and maintenance.

Some of our offices have air supplied from the same system also, here you can see the set up at the workstation in my office. The air comes in from the right of the photo, passes through a ball-valve, then an oil an moisture trap. I've installed a small ball-valve operated pressure "indicator", it's not a real regulator, just so that I know what the incoming pressure is. After that I have two high pressure quick connects, an actual regulator, and a low pressure outlet for my foot pedal. The air line running to my offices passes through about 30 feet of non climate controlled collections, then back into the AC, so I still get a fair amount of moisture condensing there and ending up in the filter. After filter is now much much drier than it was before this changeover.

Saturday, August 22, 2009

Lab reno' part two, er, maybe 3?

When we first consulted with the UT Facilities department to find out what it would cost to replace the air system, the head of their plumbing shop gave us an estimate of two guys for two weeks, at thirty bucks an hour, plus supplies and materials. That quickly comes out to a number around $6000, plus all of that downtime for the 4-5 people who work in the lab in a normal week. In dismay (and disbelief, since I know how difficult this sort of plumbing is), we asked if we could do it ourselves. The answer was yes, but clearly they didn't think it was a good idea.

After a few trips to the hardware store, some consultations, and a few hours online weighing the options, I decided to go with copper pipe to replace the mix of materials already in place and causing problems. Then, with this pile of fittings and tools, and 100 feet of schedule L pipe, Sebastian and I took to the task of installing the system. Instead of two weeks, it took two long days, with much of that time spent by me running around buying parts to make sure Sebastian had everything needed to keep the project moving. The following pictorial is a brief outline of the steps involved in sweating copper pipe.

Step 1: (Currently no photo) After cutting the pipe to length, all surfaces to be joined are scrubbed bright with a wire brush and painted with a thin coat of flux to ensure flow of solder.

Step 2: Pipe sections are mated with fittings, then heated with a propane torch for 10-20 seconds, until the metal is hot enough to melt the solder on contact.


Step 3: The torch is withdrawn, and the solder is applied to the hot joint. It will melt instantly and be drawn into any gap space, solidly connecting the two separate pieces of metal.


Step 4: The joint is wiped with a cloth to remove remaining flux and excess solder from the surface.

Friday, August 21, 2009

More traditional uses of fire in the lab...


Disclaimer: No Fossils Were Prepared in the Following Blog Post


This was an exceptionally busy week in the lab, and the only time we touched fossils was to get them out of our way. The first major phase in the lab renovation began on Monday, with half of the room being repainted. Some big cabinets with not much in them were taken off the walls, large cracks in the masonry were sealed up, and all of the existing airlines were removed, more on those soon. The walls were then given a fresh couple of coats of white semi-gloss enamel, which really makes it a whole new room.

This project was in preparation for the main event of August, replacing the compressed air delivery system. The existing airlines were composed of black pipe, galvanized, copper, brass, and maybe PVC. The compressor and tank is outside the building in 100 degree heat for most of the day, passes through the wall into a 70ish degree room, and immediately begins condensing tons of moisture in the airline. We drain about half a cup or more of water out of the tank each day, and about the same out of the water trap inside the lab. The mix of metals in the system ensures quite a bit of corrosion in the parts, most every fitting has some form of rust inside of it. The air tools have recently begun clogging at a high frequency requiring complete breakdown for cleaning several times a week.

So, the fun stuff.

With the help of the very able and German Sebastian Egberts, I've spent the last half of this week installing a completely copper air system. While I was shuttling back and forth between two Home Depots and one Lowe's buying up every fitting they had in stock, Sebastian measured and cut the copper pipe and soldered the quick connect fittings into place. After two full days of work, we have the system nearly complete and leak free, another post will follow up in detail the process of getting the system in place, with, yes, more pictures of fire in the lab.

Wednesday, August 19, 2009

Saturday, August 15, 2009

Let me stand next to your fire....

In tribute to the 40th Anniversary of the Woodstock Music and Arts Fair, and by request of Casey Holliday, this post will deal with a method developed by Holliday and Brown in 1999 at the Walt Disney World Animal Kingdom Fossil Preparation Field Station. The "Pyro Preparation" method is specifically used to facilitate safe removal of plaster and burlap field jackets from very delicate specimens. The technique was created to deal with vertebrae of Rapetosaurus krausei where much of the matrix had been removed in the field, followed by application of a thick (~2-3 cm) and tightly conforming plaster jacket. Removal of the field jacket in the lab by traditional means was impossible without significant damage to or destruction of the fossil material, as the vertebrae were poorly mineralized and subject to substantial weathering before discovery. This condition resulted in extremely crumbly bone that was very difficult to consolidate with the jacket in place. The field jacket was tightly wrapped around the neural spines and left transverse processes of several articulated vertebra, with little to no matrix buffer between the bone and jacket. The mechanical lock created by the conforming plaster exerted considerable leverage on the bases of the spines, and attempts at removing the plaster with a razor blade and Stryker cast cutting saw resulted in much breakage and grinding of elements. In desperation we decided to try fire as an option. First, the plaster is gently scored with a razor blade to expose the underlying burlap, then a volatile solvent (in this case acetone) is applied to the burlap. When ignited, most or all of the burlap burns up, allowing the next layer of plaster to be crumbled and scratched away (Fig 1). Before being applied to the fossil, this technique was attempted with the experiementers hand slipped between the jacket and matrix, to ensure that temperatures inside the block would not be high enough to cause damage through thermal shock or scortching. After several layers of burlap were burned away, the jacket was pliable enough to remove by slowly peeling it away, while applying consolidant to the freshly exposed and friable fossil surfaces.

Thursday, August 13, 2009

Cool old Carl Zeiss microscope


I found this old critter here at VPL, a Carl Zeiss Jena microscope. The right eyetube is also stamped with a Bausch and Lomb Optical, Rochester, New York logo. The last photo is after cleaning, the brass and nickle plated elements look great after a little bit of elbow grease, the would probably look even better with a lot of elbow grease.

Current lab renovation projects

So, I guess if one is going to start a blog, they must occasionally post to it. This is just about the last thing I remember to do, since I'm not yet in the habit.

There are two projects dominating my time right now, designing new work surfaces and planning for the re-plumbing of the compressed air line. I'll go into greater detail on both soon as the projects come together, both are a lot of fun, and both will be something I have to live with for quite a while, so I want to get them right. The tables are almost out of my hands, I'll be placing the final order for the tabletops tomorrow or Monday, and my sketches have been handed over to the fabricator in our facilities department to start construction on the bases.

I'm also working on cleaning up a fume hood that I rescued from the UT Surplus warehouse that will serve for a few years until it is upgraded. Pictures of that process will follow in future posts as well.