Friday, December 30, 2011

WPA Fossil Preparation 1939-1941


The last time our nation was being crushed by a crippling global economic depression, we did our darndest to paleontology our way out of trouble. That's right. The state of Texas was crawling with armies of fossil prospectors, preparators, mount makers, and researchers, all collecting, quite literally, tons of fossils. Sadly, WWII came along too soon, and therefore we don't have the historical precedent to show that employing paleontologists is the solution to our national woes. Even though it clearly is.

Anyway, the program was administered by the Works Progress Administration and directed by Dr. E.H. Sellards of the Bureau of Economic Geology. You can read more about the amazing work these folks did here, and here, and about continuing research on this material here. The specimens were brought to Austin for preparation and curation, and have mostly ended up in our collections. A number of these are on display at the TMM, some are exhibited at the American Museum of Natural History, and some at the Smithsonian. I've been working through VPL archives for documents and specimens to exhibit to showcase the history of some of this work, and in doing so have come across a large number of great photographs of the preparation process. I can't help but hear Tom Waits singing Alice when I look at these pictures.

[Note: Bloggers photo editing capabilities still suck, so these aren't organized coherently or even artistically, or even actually centered reliably. What is this, 2004?]
Original caption: Scene in Preparator's Laboratory

Preparator reconstructing Glyptodon carapace
Preparation of the Onion Creek Mosasaur. This skeleton is still on display at the Texas Memorial Museum.

Another view of the preparation lab. The mosasaur skull is visible on the left.

The lab was in part of the University called "Little Campus". Great lighting.

Onion Creek Mosasaur skull.

Rhinoceros skull undergoing preparation.

Onion Creek Mosasaur lower jaws. I find this picture somewhat haunting.
Professor Emeritus Ernest Lundelius recalls visiting this lab as an undergraduate in the early 40s.

Preparators working on Texas mastodon bones.

Sunday, December 11, 2011

Historic fossil goo... er, glue recipes

From The American Journal of Pharmacy, May 1875 p. 225

Friday, October 7, 2011

William D. Turnbull 1922-2011

Sad news. One of my favorite days during my time in Chicago was spent packed into the cab of the Geology Department pickup with Bill Turnbull and Bill Simpson driving to Rainer Zangerl's home several hours south in Indiana.  I helped Simpson pack specimens and documents from Zangerl's basement while he and Turnbull caught up on the front porch and shared iced tea (both had started at the Field Museum at about the same time). It was a sweaty, dusty, silverfish-filled day, but also filled with great stories and time spent with Bill, and I remember it fondly.

Reposted email from Pete Makovicky, FMNH Geology Department Chair--

It is with great sadness that the Geology Department marks the passing of Curator
Emeritus William D. Turnbull. Bill passed away Wednesday following a short illness.
Born in 1922 in Milwaukee, Bill attended the University of Wisconsin, Milwaukee
and graduated in 1942. After serving in the Army during WWII, Bill joined the Field
Museum as a fossil vertebrate preparator in 1946. Bill earned his Ph.D. degree in
Paleozoology from the University of Chicago while working at the museum, and
ascended to the post of Assistant Curator of Fossil Mammals in 1956. He was promoted
to Associate Curator in 1963, and again to Curator in 1973. He also held lecturer status
at the University of Chicago and University of Indiana at South Bend, and was a
research associate at the University Texas at Austin and the Western Australian
Museum. He served the Society of Vertebrate Paleontology as Vice-President from
1975-1976 and as President from 1976-1977. Bill retired in 1987, but continued to come
to work daily as long as weather and health permitted.
Bill was an avid field paleontologist and his collecting efforts ranged widely in the
US from the South to the western states, as well as farther afield in Australia. He made
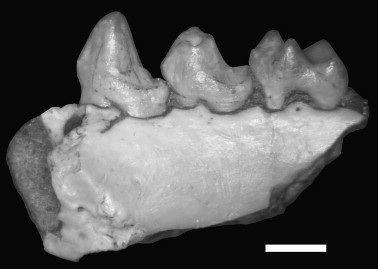
significant contributions to the Museum’s collections, and his collections of Eocene
mammals from the Washakie Basin are spectacular. Several of Bill’s most spectacular
finds are on display in Evolving Planet, including the mosasaur Globidens, the turtle
Naomichelys, and the aïstopod amphibian Pseudophlegethontia turnbullorum named in
honor of Bill and his first wife, Priscilla. Bill’s scholarly publications ranged widely,
covering topics such as jaw mechanics of archaic Mesozoic mammals, descriptions of
marsupial and rodent faunas of the Australian late Neogene, to Pleistocene mammals
of the Midwest. Bill was working on manuscripts on the remarkable Eocene finds he had
made in the Washakie Basin in Wyoming, the mammalian fauna from the Madura Cave
in Western Australia, and on the history of the department, when he fell ill.
During his long tenure at the Museum, Bill interacted with generations of
scientists, ranging from Elmer Riggs, the first vertebrate paleontologist in the Museum’s
history, to the current cohort of curators. He collaborated with colleagues from across
the globe. He will be remembered as a dedicated professional, a wonderful citizen
to the department and the institution, and as a warm and caring family man. His
legacy lives on in innumerable ways, including in the many specimens and scholarly
contributions with which he enriched our exhibits and science, and in the memories we
all have of his life as a Museum scientist.
Bill is survived by his wife Hedy, his stepdaughter Eve Band and her husband
Steve and their two daughters; his granddaughter Lindsey Goodwin; his stepson Harry
Brotman and his two daughters; his brother Alan Turnbull, sister Jane Przedpelski, and
their spouses and children. Condolences can be sent to:

Hedy Turnbull
Montgomery Place
5550 S. South Shore Drive, Apt. 514
Chicago, IL 60637
--
Peter J. Makovicky
Associate Curator and Chair
Dept. of Geology
Field Museum of Natural History
1400 S Lake Shore Drive
Chicago, IL 60605
Ph: (312) 665 7633
Fax: (312) 665 7641

Small scale molding and casting at UT


Vacuum pump and chamber on handy cart
More than a decade of disappointment with the quality of my casts is over, the day has finally arrived where I have assembled and tested a fantastic system for making itty-bitty casts with which I am extraordinarily happy.  After my exciting and implosive night back in June, the start of this fiscal year has allowed me to procure a new vacuum chamber, finally completing the apparatus for making beautiful bubble-free minute molds and casts. There are a number of publications detailing protocol and equipment for achieving these (e.g. Reser, 1981; Davies, 2010; Reser, 2011; and Cavin, 2011), our process most closely follows that refined by Reser (2011). Equipment includes a Welch Duo-seal 1402 vacuum pump, a Smooth-On branded five gallon vacuum chamber, a digital scale, and a 2.5 gallon pressure pot.

Test specimens were molded with Polytek Platsil 73-25 RTV silicone rubber, and cast using Smooth-On Smooth Cast 300 pigmented with Polytek Polycolor Brown (approx 1 drop per 100g). Specimens were clayed-up in standard fashion, including imprinting the specimen number into the sulfur-free clay. Silicone was de-aired in the vacuum chamber, and a very thin coat was painted onto the surface of the specimens. A light stream of air (~15psi) was passed across the silicone to spread and pop any air bubbles that might remain, and the remainder of the rubber was poured to cover the specimen completely.


Digital scale, pressure pot, and two in-progress molds
Upon demolding 24 hours later, the silicone molds contained no visible surficial air bubbles, even at 50x magnification. Casts were produced by painting in a thin coat of Smooth Cast 300, making sure that there were no trapped bubbles, quickly pouring the rest of the resin, and then the mold was pressurized to 40psi for 15 minutes. At this point, the resin was completely cured and demolded. Pressure cast examples showed no air bubbles at all in the final cast, while those that were merely painted and poured contained some bubbles at or just below the surface. Once the molds are made, the entire process of casting one specimen, including setup and cleanup, takes no longer than 30 minutes.

All of these specimens were scanned at UTCT, and we plan to CT scan these casts also. Our next step will be to compare the fidelity, ease of production and handling, and final costs associated with methods of digital imaging and printing vs. conventional casting.  A paper is soon to follow. Subsequent blog posts will detail the procurement and assembly of this casting system.
This is what I call one helluva bubble-free cast- TMM 41672-233 (cast) Click the image for full resolution.


References

From Kirk and Williams, 2011. TMM 41672-233 (actual specimen). Scale= 2mm
Cavin, J. 2011. Vacuum molding and casting for bubble-free fossil replicas. Proceedings of the 4th Fossil Preparation & Collections Symposium. Brigham Young University Geology Studies Volume 49(B):24-28

Davies, K., Cifelli, R., Davis, B. and Gordon, C. 2010. A simple microvertebrate molding and casting technique: A 20-year retrospective. Programs and abstracts from the Society of Vertebrate Paleontology meetings, October, 2010.

Kirk, E.C., and Williams, B. 2011. "New adapiform primate of Old World affinities from the Devil’s Graveyard Formation of Texas". Journal of Human Evolution

Reser, P. 1981. Precision casting of small fossils: An update. Curator, 24:157-180.

Reser, P. 2011. Cost effective assembly and operation of equipment to make excellent casts. Proceedings of the 4th Fossil Preparation & Collections Symposium. Brigham Young University Geology Studies Volume 49(B):6


Wednesday, October 5, 2011

The research nature of museums

I was asked a question not too long ago about what kind of labs a museum could need and why, and I was pleased enough with my explanation that I thought I'd put it here. The question was a reminder that most people see museums very differently from those of us who work in them on a regular basis.

When I'm visiting museums I often forget that they have exhibits, for me museum trips are typically behind-the-scenes and I rarely make it into galleries for any appreciable amount of time. Most big museums are research institutions whose primary duties are the care and storage of historical or art objects. Many of them are associated with universities, like the Texas Memorial Museum (UT) which has public exhibits, and specimen collections are spread out through several buildings across campus. Others, like the University of California Museum of Paleontology (Berkeley) have limited exhibit space and exist predominantly for research and educational purposes. Curators in large private museums are often faculty members or otherwise associated with local universities and advise graduate students (e.g. American Museum/Columbia University, The Field Museum/University of Chicago), using the museum resources to train scientists. In most museums, the exhibited specimens represent only 1-2% of the institutional holdings. UT, for example, has hundreds of thousands of vertebrate fossils in our collections, and 20,000 recent animal skeletons. All of these objects require varying levels of work to make them available for study or display, to prevent deterioration, or to repair damage, and that takes place in a wide variety of labs and workshops. So, an art museum will have conservation labs dedicated to cleaning and restoration of paintings, or analysis equipment for determining authenticity of artifacts. A natural history museum will have labs dedicated to CT scanning fossils or mummies, labs for fixing and pinning insects and plants, or slicing up and analyzing meteorites to figure out how old the solar system is. Researchers from all over the world come to visit these collections and sometimes borrow these kinds of objects, so collections managers act as a sort of reference librarian to keep track of, care for, and make available the specimens. These resources are the foundation for how we understand past cultures and the natural world, and the public exhibits are intended to give visitors a window into the knowledge we've gained as a result of that research.

I'm sorry, I'm kind of tied up at the moment....

Two teflon tape supports, tightly wrapped close to the spine, and loosely midway down the ribshaft.
 This afternoon while re-adhering a broken rib to the exhibited mount of Homotherium serum, I was frustrated in my attempts to hold the rib steadily in place while the Paraloid B-72 set. This is a familiar problem for preparators, often we can set a specimen in a sandbox and balance one broken bit on top of the other using gravity as a clamp. Irregularly shaped specimens, or mounted skeletons, as in this case, can create a real challenge to securely reattaching broken elements. Every time I invariably moved, the join would slip and prevent a good fit. Here, gravity was instead working against me, as it sometimes does. Watching this inelegant dance, TMM exhibit designer John Maisano went back to his shop to find a solution; string, or wire maybe, something to replace me in the equation. What he came back with, in a stroke of genius, was a roll of teflon plumbers tape.

He wrapped the tape around the rib and handed the roll to me. I promptly dropped it (gravity again!), and had no choice but to stand there with gluey rib in hand watching it unroll itself down the landform. After John rolled it back up and handed it to me again with a stern warning, I started wrapping the tape around the two halves of the facing rib, clamping them together. Wrapping around the vertebrae provided more support, and loosely wrapping the broken rib to one of its neighbors controlled droop in that plane as well. This method was superior to using adhesive tape or string, which would have been very difficult to remove had they been glued in place. It is far gentler and easier to work than wire would have been, especially considering how delicate these poorly mineralized bones are. A method that will change the way I work, for sure. Thanks, John, for the idea!
Now we just have to get those arms back on!


Tuesday, October 4, 2011

Tube wringer

When you absolutely, positively, have to get those last few drops of Paraloid B-72 out of your Koob Tube. Or oil paint. Or toothpaste. The Tube Wringer-

Wednesday, July 13, 2011

Oh, dear Marsh pick,

SVP logo, feat. Marsh pick
How happily I smash rocks with thee....

Today, a member of the preplist asked for photos with scale for use in recreating that ubiquitous paleontology icon, the Marsh pick. In the VPL prep lab archives I've come across a letter from Wann Langston to someone at the AMNH (or maybe it was a response, anyway, correspondence of some sort from somebody to somebody) from the 60s or 70s discussing the multitude of pick heads boxed in the basement with a price of $7 plus postage for anyone wanting one. Damn that those days are behind us! As soon as I find that letter again I'll post it here.

What is a Marsh pick, some might ask? Well, youngster, before the rise of the Estwing Rock Hammer, the Marsh pick was "the universal field tools of vertebrate paleontologists," as described by Ned Colbert in "A Fossil Hunter's Notebook"(1980, p. 131). His wife, artist Margaret Colbert, incorporated it into the design for the cover art of the Society of Vertebrate Paleontology News Bulletin, and it was later adopted by the SVP as the organization's official logo, which can now be found on all sorts of nifty SVP swag (proceeds of which go to support the Society.) I've compiled what information I have at hand here in this post, and would be highly interested in hearing from anyone who can add to the fact or lore associated with this instrument.  

The first printed reference I have seen relating to our story comes thanks to blogger Michael Ryan, who contributed the following bit of paleo history to the internet in 2006 (there were blogs way back in 2006? Holy crow!) Beyond this, I do not know much about the genesis of the famous whacking tool.
Popular Science August, 1932, From Palaeoblog
I have been told that this is not the earliest example of such a tool, and that it was devised by O.C. Marsh himself, and it is certainly possible that Brown modified the design in such a way as to improve it. Additions like the U-shaped spring clip might be what led him to claim inventor status, and that Brown's dinosaur pick only later became synonymous with Marsh's. But, like I said, I don't know. It is exceedingly difficult to tell from historical photos whether pictured picks are the ones we are discussing or standard large railroad picks. There is a photo in Dingus and Norell (2010, Fig. 23) of Brown in the Red Deer River in 1912 that looks Marsh picky. Chime in if you can prove the case one way or the other.

The next Marsh pick sighting of which I am aware is courtesy Charles Camp, in Methods in Paleontology (1937). After discussing how it should only cost $10 a day to hire a team of horses and a "Fresno" scraper (a plow) to clear overburden, Charlie gets into the nitty-gritty of pick selection. His unapologetic opinion follows as such:
Tools for excavating include: shovels, large railroad picks, small "drift" picks, paleontological or "Marsh" picks (fig. 4c), which, by the way, are more expensive and scarcely better than a good, light "drift" pick (fig. 4a). A crowbar is sometimes handy.
Ouch. But something changed the minds of a generation of paleontologists in the 43 years between Camp's thoughts and Colbert's observation. Although, I don't use one in the field very often either, my long-handled Estwing rock hammer has served me well for >10 years. [A brief aside: I can't stand those Estwing Geo/Paleo Picks. I just find them to be sized all wrong. Too short to be useful as a two-handed earth mover, too long (only slightly, though, if you're 6' plus) to be used accurately as a one-handed rock hammer. Also, the weight is all wrong. It fills a middle niche that doesn't really exist, in my opinion. To move serious rock, you need mass X acceleration, a strong point, and the leverage of a long handle for both a decent swing and prying power once the tool tip is embedded in your target. Target, I said, not the fossil. I suspect that if you think the Paleo Pick is for you, a few lessons on the proper mechanics of a good 3lb pickax might change your mind. Oh! And the padded handle! You cannot slide your hand along the length of haft as you swing, which results in even more and less efficient labor! And the stupid handle is round! You've got to squeeze it tighter to keep it from rotating, which leads to even more fatigue! Somebody's gonna hurt themselves with one of these.] Ok, that wasn't brief, and we haven't even addressed the original request, pictures and measurements of the tool! From here on out, I'll let the pictures do the talking, with details in the photo captions. Like I said, I want to hear more if you've got sources!

[You can click on the pictures here for full size images]

Two examples of Marsh picks, with my Estwing 22oz long handled rock hammer for reference. The stainless steel pick on the left was recreated as part of a commemorative run for the 2007 Austin SVP meeting. This design was replicated from Ned Colbert's personal Marsh pick (the very same SVP logo model) now owned by his grandson, Matt Colbert. A commemorative coin was incorporated into the side with the Austin meeting logo embossed on it, and picks were made in both stainless and tool steel. This version is most similar to the Barnum Brown designed model, complete with U-shaped spring clip to hold the head in place without damage to the ash handle. The pick on the right was described to me by Tim Rowe as being a representative of the "Carnegie strike" of a slightly different pattern. This is distinguished most easily by the inclusion of the somewhat sharp shoulders where the spikes meet the eye. This tool is covered in paint and rust, and has been battered and reground, but I suspect it was cast rather than forged, and those shoulders are there to add strength to the transition between spike and eye. This may be why overall dimensions are a bit greater. The Colbert pick was made with both 22" and 36" handles, and the "Carnegie" pick has a 21.5" handle.
"Carnegie" Pick: 15.25" OAL, 1.625" max height          Colbert pick: 13.25" OAL, 1.625"max height

"Carnegie" pick: 1.25" at widest part of eye, .4375" most of length of spike before both point and blade.  Colbert pick: 1.25" at eye, .3125" width of spike


Monday, July 11, 2011

Let's go tubing!

Watch interviews with Petrified Forest National Park preparators Matt Smith and Kenneth Bader on YouTube (or right here on this very page) to learn more about the life of a fossil once it has been collected.

Cat Scratch Fever!

Taking advantage of the summer A/C maintenance related closure of the Texas Memorial Museum, we've taken the opportunity to pull some specimens from exhibit for study, conservation, and, in the case of the subject of this post, mold making. One of the stars of the TMM exhibits, a 1 and 1/4 size Homotherium serum  bronze sculpture adorns the front steps of the Museum. Pretty wicked, eh? A large number of specimens of this animal were collected 60 years ago from Friesenhan cave by TMM paleontologists, you can read more about the finds at the Museum's webpage.  Our collections hold what I understand to be the only complete skulls and skeletons of these lion-sized animals, including a couple of kittens!
Homotherium serum at the TMM, image courtesy Wikimedia Commons Skb8721

We've begun re-preparation and conservation of some of the holotype material, including the forelimbs from this mount, as well as molding and casting the specimens. We anticipate having a complete composite skeleton available in a few months time.
Sterling Nesbitt examining casts in progress

Left manus before conservation. Covered in chicken wire and dental cement.

Same hand after removing the accumulated crud, consolidating and repairing the bone, and correcting the articulation of the phalanges.

Elements laid up in clay for molding. RAWR.
Head and neck, sans atlas. What's that you ask? Oh, that! Yes, that skull is actually bronze. No, it really doesn't really get much more awesome than that. We made these bronze skulls for the Mammoths and Mastodons traveling exhibit developed by the Field Museum of Natural History. 


Sunday, July 10, 2011

Ridin' dirty

Now, witness the waterpower of this fully plumbed and operational polishing station. All right, all right, so maybe it's actually much closer to White and Nerdy. But, Sterling and I did get our hands very dirty getting this set up. Part one of Operation: Histology Lab was plumbing in a sink and Buehler Ecomet 3 Grinder/Polisher. The sink came from surplus, the grinder from my genius lab equipment supplier. Even though this room used to be a bathroom, there was no drain easily accessible. Fortunately, the sink in the prep lab is adjacent to the doorway to this space, and the hot water heater and plumbing are mounted inside this room. So, it was relatively straightforward to tie into both by punching a small hole in the wall and linking to the drainpipe for the prep lab sink. This also allowed us to clean 20 or 30 years worth of crap that had fallen behind the sink, including several complete stacks of paper towels that made for some awesome ant-farm-like rodent nests.
Yeah, this is more like what the mess in that closet looked like when we started, but this is after I already removed the flammable cabinet, a big bookshelf full of junk n' stuff, another smaller bookshelf full of the same, and another of the 48"w metal cabinets. Did I mention this room is 8'x13'?

Sterling cleans up the nastiness that remained after he cut out the back panel of the sink in the prep lab.

We took turns chiseling a hole through the wall for the drain to pass through, and I removed those faucets and tied into the hot and cold water to supply the sink and Ecomet.

Above the blue tape is where I cut the existing sink drain and tied in the new drain from the left, with the tee.

Trimming the existing drain pipe.


The Ecomet is plumbed on the supply side from the former eyewash mount with a ball valve here. There is also a valve under the sink, where we transition from the half inch pipe to 3/8 copper flex line and a compression fitting. I could probably do away with all of this for a cleaner behind the wall solution, but this looks kinda cool. Some day I'll make up my mind. On the return, the Ecomet bowl drains through a 1" ID vinyl hose into a tee I installed just above the P-trap under the histo lab sink. A pretty elegant solution, if I do say so myself.

Now I have to pee.

Friday, July 8, 2011

Plans for a histology lab

Ok, let's pretend I wrote this post a few months ago, when I actually started working on this project; you'll see an amazing and rapid progression over the next couple of days as I post the steps of the process that have been ongoing for a while now.

The goal of this project is to turn this cluttered (really, it was about 1500% worse than this photo at one point) storage closet and former VPL unisex bathroom into most of a histo lab. Over the past few months I've been accumulating equipment and cleaning all the junk out of this 13'x8' room with the intention of cutting a doorway in the far wall where that flammable cabinet sits in the photo. My goal was to connect this room to the office on the other side of the wall, creating a 26'x8' space, effectively a "clean room" on one side and a "filthy room" on the other. This is the design evident in the 3D rendering that I created in Google's SketchUp program. Which is an amazing program, and needs its very own post expounding upon that amazingness. I'll get to it one of these days.
So, several of our graduate students have been involving histological analysis in their research, and had been doing some of that work in the thin-section lab on the main campus in the Geology Department. Due to circumstances that I'm not aware of, our access to that space was revoked, and I was asked to find a place for the materials that we had already bought, which at that point was mostly the Buehler Isomet 1000 trim saw, some resin, and a minifridge. Since I'm a firm believer in one stop shopping (convinced that I can do almost everything cheaper and more accurately myself),  coupled with the goal of having our students exposed to the widest array of tools and techniques possible, I drafted an initial design for the lab. Future posts will detail the process of getting from the above photo to the below image. It has been lotsa fun so far!

The whole proposed lab, we aren't cutting a doorway in the wall now, though
Detail of histo lab

Molding class: Day 2

Molding class day 2 happened and it was also a great success. Most of the original group returned and some new people who couldn't make the first one attended also. Felt like I couldn't just leave that hanging.

Saturday, June 18, 2011

Molding class: Day 1

The group in the classroom mounting the specimens in clay. 
Yesterday saw the completion of the first day of a fairly informal molding class held at VPL. It was organized and mostly conducted by Dr. Sterling Nesbitt, with a little bit of help from me. The class was made up of a mix of volunteers and staff from both VPL and our neighbors NPL (the Non-vertebrate Paleontology Lab), undergraduates and UT VP grad students. The day started in the classroom with a safety briefing, followed by an introduction to different types of molds, an explanation of what we were molding and why, and conversation about ensuring that one has permission to make a mold before proceeding. Then Sterling gave a brief overview of the methods that he has been using to create molds for his research program, using pre-completed examples of the distinct steps in the process. The students next selected specimens and jumped into the process, first laying several bones up in clay, then applying Aeromarine AM 128 RTV silicone. Clay work was done in the classroom for the table space, and then rubber was poured in the prep lab. Due to a previous mishap with our vacuum chamber, the rubber was not evacuated before pouring, but a small amount was poured slowly and brushed over the surface of the bones. Then, a light amount of compressed air was directed at the bone surface to spread out and thin the rubber, the stretching and popping many air bubbles. The first halves of the molds were allowed to cure overnight, and next Friday the group will return to pour side two.

Weighing and mixing silicone
This served as a pretty good test of the lab design, which is geared towards teaching medium sized groups of students paleo lab methods in a hands-on fashion. The classroom has two large tables and space for about a dozen comfortably, a projector, and blackboard, and is directly adjacent to the prep lab. The lab space is currently divided up into two rooms, the large main prep area, and small work space with a fume hood and separate sink for acid work and casting and molding. Two more lab spaces are currently under renovation from an office and storeroom, becoming a histology lab and rock saw/air abrasive lab. I feel that the setup worked out pretty well, it has been functioning as a research preparation lab quite effectively for two years, with a large number of undergraduate volunteers and grad students having been trained one-on-one already.

[Edited 6/19] To spell Sterling's last name correctly, def Nesbitt, not Nestbitt. Sorry dude!
Painting and pouring silicone

Friday, June 17, 2011

This headline says it all...

Panhandle man cleaning foot sets house on fire... from the Sun Sentinel. Ok look, I lived in Florida for a year, and I'm not going to say that it is a state chock full of rock surgeons, but COME ON!

Wednesday, June 15, 2011

KA-BOOOOM!!!!!!

Speaking of lab safety.... I spent the evening soldering up a copper connection between my Welch Duo-seal 1402 vacuum pump and the cheap Nalgene bell jar that was on the shelf when I got here. Now, I figured an old plastic vacuum chamber (circa 1989) might not be up to the task of withstanding the forces, so I took precautions. Namely, I was wearing PPE and had my camera handy. As the gauge drew nearer and nearer to 30inHg I grew more and more incredulous that I really did such a great soldering job in the first place and that seals weren't crumbling at all and the bell jar seemed to be holding up to the constantly increasing stresses while the tension in the room grew palpable, somewhat squishy though oddly unyielding, and as it passed 29inHg and crept ever closer, yes improbably still closer to thBAM!!!!!e baseplate imploded with a thunderous crack and blasted shards of brittle plastic far and wide (and into my noggin' and torso), and catapulted the bell jar through a series of somersaults in the opposite direction. I immediately pulled the plug on the pump, took some photos of the mess, and then flipped the camera around to see myself smiling through the face shield I was not-accidentally wearing. Damn good thing this test wasn't conducted with a pot of resin in it, eh? That wasn't an accident either, by Jove! So now, as the hour has drawn late, I plan to stop on my way home at the local tavern for an oat soda.
[Edit 6/16] A friend on Facebook asks Q: What makes the baseplate so shitty?
A:The baseplate isn't inherently shitty, just made of plastic. And plastic doesn't last worth a damn, even though we think it exceptionally clever to build everything out of plastic these days. This baseplate was probably 20 years old, and if I'd peeled up the stuck down gaskets I would have seen some crazing that wasn't visible from the bottom. I'm guessing that this is a result of not just age, but also resin fumes. Contrary to "The Graduate", plastics are not the future. They are a temporary present.

Shame on me for not taking a Before picture. This is, uh, After.
Why is it that only old guys wink any more? I think we should recapture the non-flirtatious wink.

Whoops!